Saturday, May 06, 2006
We have Water!

The water truck showed up at 5PM and had to wait until about 5:30PM before he started filling...
It only took three loads of water to fill the pool and spa!

Now, I have to brush the plaster, every square inch, 2-4 times/day for the first week and 1-2 times/day the second week.
The spa outside wall still needs to get stone and the equipment wall still needs siding.
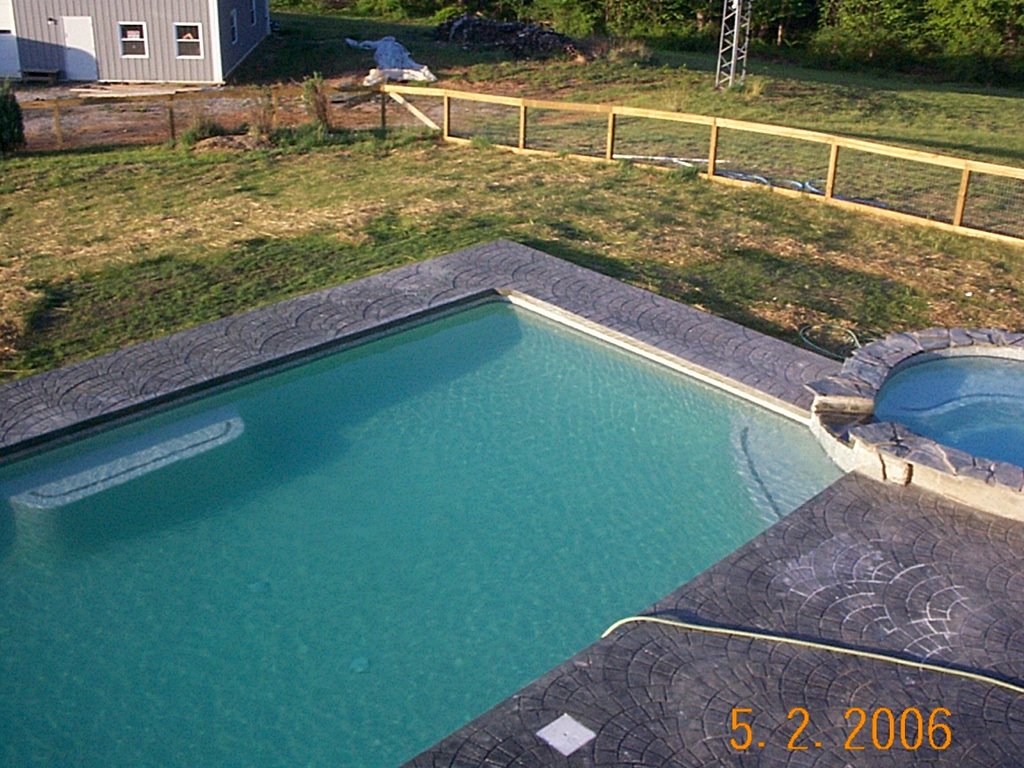
Tuesday, May 02, 2006
Plaster!

The plaster guys were supposed to show by 12:30PM on Monday. Water was lined up for 4:30PM that afternoon... Plaster guys didn't show until 3:30PM and the water company was threatening to cancel the order.
One long FINAL weekend...

I scheduled plaster back in the Fall. There was no way that I was going to get rescheduled because I was not ready. I took Friday, 4/28/06, off from work and started placing stone on the top of the spa wall and spillway. This was a chore! It took all day just to fit the puzzle together. I finished laying half the stone before quiting late Saturday morning.
I rose early Saturday morning and finished the top wall stone. I still have to come back and cut the outside edges after I set the side stone in place. The next job was to finish the tiling around the spillway. I started grouting around 7:30PM and ran out of grout around 1:30AM, Sunday.
Later Sunday morning I went over to Lowes (www.lowes.com) to pick up more grout. I got there as the opened the store and was back home by 8:40AM. I finished grouting by 11:00AM, which will give the grout a full 24 hour cure. Plaster is expected to begin around 12:30PM on Monday.
I started to install the spa jets but had to cut it short to set up for Tony's baseball game. When we finally returned, Bob & Pat stopped by and helped clean out the pool one final time. Bob swept and Pat vacuumed. I ran around installing jet plaster caps on the jet tubes and got the skimmer ready - basically kept busy enough to not look like I wasn't doing anything while my 75-year old in-laws cleaned the pool!
Saturday, April 15, 2006
Let's Catch Up...
I had 20 yards of topsoil delivered. I spread it around the pool area to cover the red clay from the dig out. I purchased 60 pounds of Turf Alive III w/ Rhizomes (www.gardensalive.com) and spread at twice the recommended rate. I used about 26 bales of straw to cover the seed after I rolled it into the soil with my 4-foot roller. The seed has started sprouting this week.
I built a wall between the house and the porch column to separate/hide the pool equipment from the pool area. The plan is to cover it with gray vinyl siding.
The electical work has been completed and inspected. I have initially failed my final building inspection. One gate was installed with an incorrect swing - needs to swing away from the pool. I also failed to have the rebar inspected prior to pouring the pool.
This really angered me. I called the inspection in last fall but I was told I only needed the bonding electrical inspection! My solution is to certify the installation with photos and a PE's signature stating all is well.
Today I will start the tiling process...
More photos soon.
Monday, January 02, 2006
Patio Pouring...


Finally, Mother Nature let me get the patio around the pool poured. I was all set to do this job myself. I had the help, Evan, lined up. I had my phone to my ear to place the concrete order...and then I just chickened out!
I called John Russell, the guy who poured most of the concrete in my house. Luckily, he was still in business. And, he talked us into getting the patio colored and stamped....more money,too.
As always, there was a mistake - not enough concrete was ordered to finish the job. So, right now the sidewalk on the opposite side of the pool is not completed. The mistake was a combination of several factors: the grading, the concrete patio depth, and the actual amount of concrete delivered. I did the grading when I formed the patio. I wanted it to have more slope than is typical to ensure water runoff to the drains. So, this caused a greater thickness in the patio when John did the pour. It was such a large area that a simple 3/4"-1" thickness increase adds a lot of concrete.
However, the first truck poured a section that I calculated to be 8 yards and it was supposed to be 10. Given the thickness increase, I think LaFarge cheated us no less than a yard!!! The name of the company sounds French...need I say more!
We are now waiting for better concrete weather to finish the patio job!
Friday, November 04, 2005
Rough Grading Complete
I finished grading the dirt around the pool and also the fill I moved to the frontside of the house. The fill I moved behind the shop can't be touched - still too wet and no sun this time of year gets back there.
I should take a picture because it's starting to look like I know what I am doing. More progress will be made next weekend after youth sports come to a close for the year!
Tuesday, October 11, 2005
We needed the Rain, but ...
I cleaned up the forms and redid the gutter drain. I covered some of the piping with dirt to help support/protect the pipe from tractor buckets of fill. This was done with a shovel and I always find it amazing how much dirt one can move with a shovel! Several piles under the porch had to be shoveled by hand because the tractor would not have been able to get in there. I then was able to start grading with the tractor again.
I have nearly completed the rough grading. The rain has done a nice job of packing the soil in around the pool!
Work on the pool will cease until 10/25. In case any pool building fans (say hi to Vicki for me) are wondering, I am taking a guided hunt for elk in the Sawtooth mountains of Idaho.
Friday, October 07, 2005
Holds Water
Well, in preparation for the tropical storm that is moving through right now... I removed the forms, re-installed the gutter drain pipe, and backfilled the framed-in end wall...
At least, I can see that the pool holds some water... no chance of pool building this weekend.
Monday, October 03, 2005
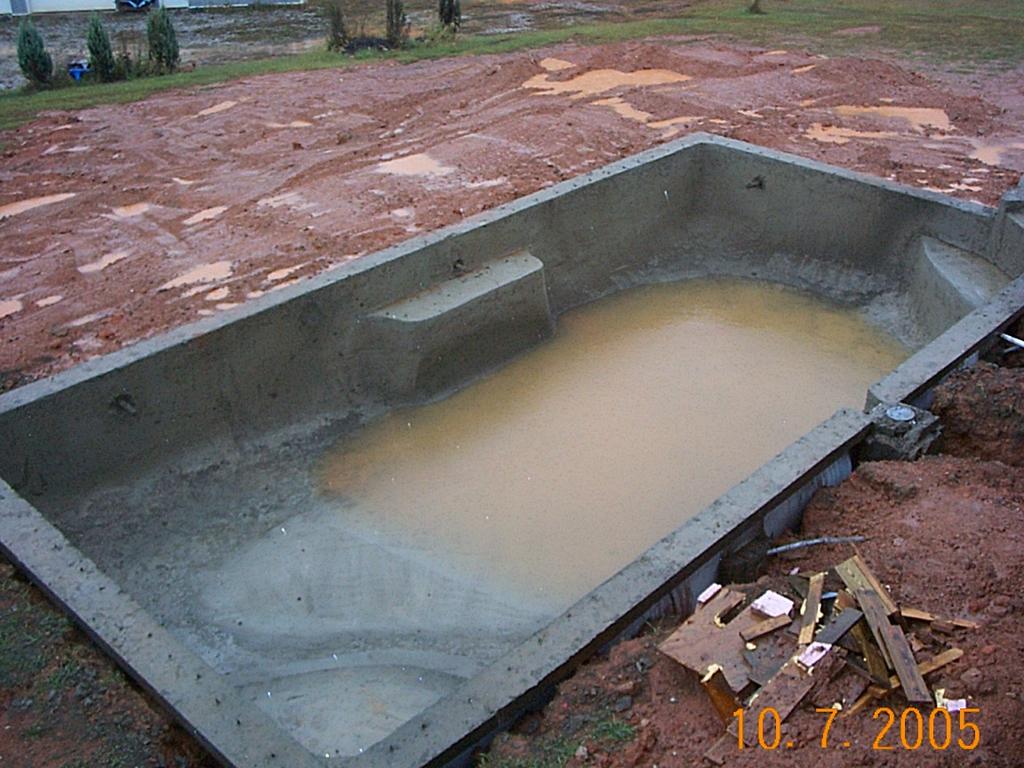
Shotcrete Complete!

Wow...
The lighter spot of concrete in the pool is where we ran out of concrete and had to wait for more. They called in 3 yards, but used only 1.5 yards.
The rest was dumped in a huge pile in my driveway!!! So, I had to spread it out - busted my arse! The driver was new and didn't know any better. He was too nice to scream at!
Shotcrete Day

The crew arrived at 6:45AM. They prepped the site until about 7:45AM. The shotcrete showed up then and they started pumping!
Here they started blasting against the framed wall - no blowout!

Sunday, October 02, 2005
Final prep...before shotcrete
I filled the hole leading to the spa where all the pipes go. I tried to pressure test the spa jet plumbing. I used Xtrawide Duct tape and hose clamps to seal the 2-1/2" pipe. I was able to get up to 10 psi before the tape starting to split. I detected no other leaks as I inspected the joints while the pressure was still relieving.
Saturday, October 01, 2005
Grading - Step 1
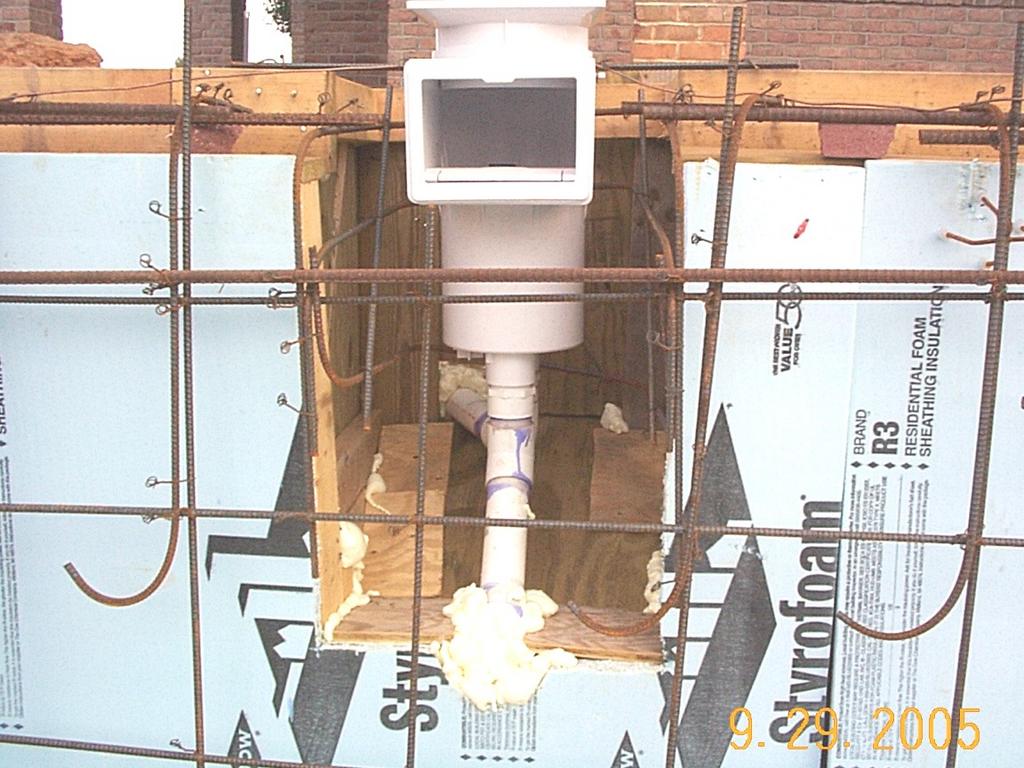
Thursday, September 29, 2005
Spa Jet Plumbing

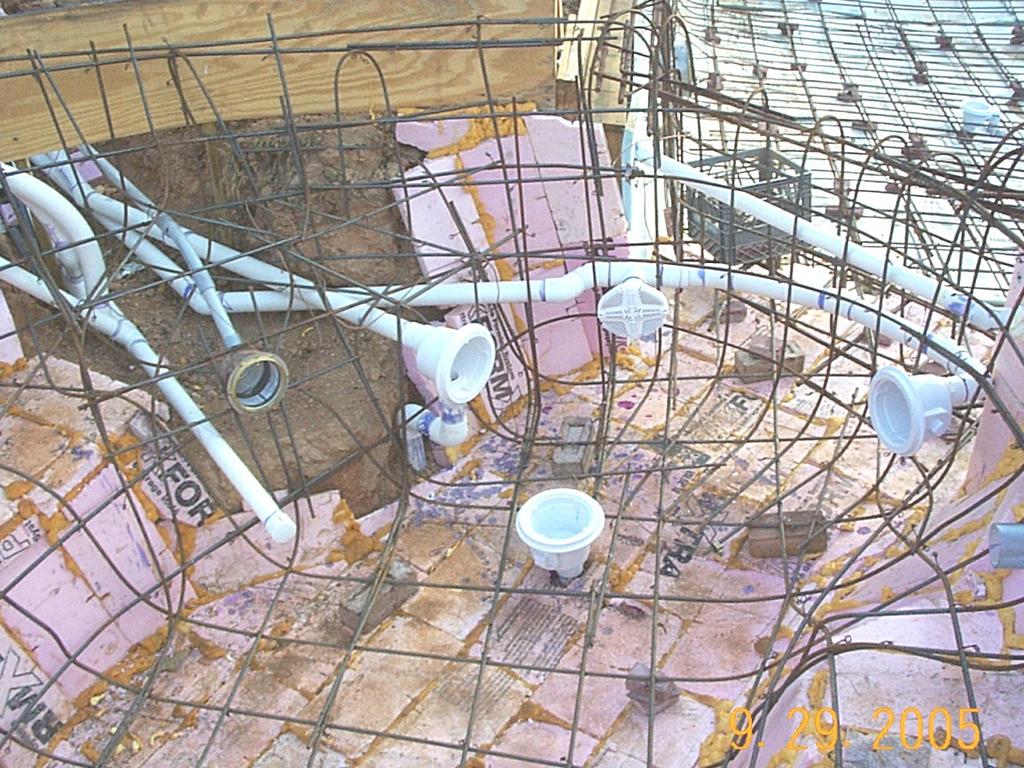
Tonight, I finished the spa jet plumbing lines. The flex pipe is not that flexible...it tends to want to remain coiled. This posed problems trying to connect to the fittings. The natural recoil of the flex pipe puts stress on the glue joints while curing. I used some elbow fittings (22-1/2 & 45 degree) to relieve joint load. Still, I might have leaks. I have no way of obtaining 2-1/2" pvc pipe caps to seal the jet pipes and then pressure test it...oh, well, I hope the shotcrete holds it all together.
Tuesday, September 27, 2005
Spa Suction Plumbing
I had a problem with the special order 2-1/2" PVC pipe I ordered for the spa tee fittings. They sent me 1/2" pipe instead...lucky I rushed the order to arrive a few days prior to needing it! the correct pipe should arrive tomorrow.
2-1/2" sch. 40 pipe is not a common size and isn't stocked at the local hardware stores. I found a supplier outside of Phily on the internet. I had to open an account and place a minimum order of $100...but that only got me 10 feet of pipe! I only needed 8 feet... ten foot of 2" pvc pipe costs about $8.
A chance for shotcrete on Friday...stay tuned...
Sunday, September 25, 2005
Final Pool Work

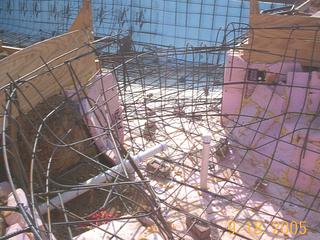
I reinforced the pool end wall. I felt like the foam was going to be a little weak for the shotcreting if it didn't have ground support behind it. This is the wall that was framed up near the spa. Also, a lot of dirt had fallen in and pushed in the foam too close to the rebar.
I added a little more rebar to the steps, too. When you have extra rebar laying around, then you just feel compelled to use it.
Saturday, September 24, 2005
Home Stretch

Again, a late start today. I fixed the spa light niche orientation. The electrician kind of messed it up when installing the conduit. So, I bought some conduit fittings and redid the right way.
I installed the pool and spa returns.

I started to install the spa suction drain and realized that I didn't have anymore 2" 45-degree fittings. So, I started to work on the spa jet plumbing. That was a fiasco. You can't install straight pipe in a round spa! I was planning on making an 8-sided or 16-sided polygon. I couldn't locate 22-1/2 degree 1-1/2 fittings though. I tried using the 45-degree fittings, but gave up half the way around the spa.
The special order 2" fittings will arrive on Tuesday, 9/27/05, but I probably won't use them. I decided to order the flex pvc schedule 40 pipe for the spa. I didn't like the stuff originally because it has a lower pressure limit - not that I actually have spent time figuring out the pipe pressure to make an assessment...just going on gut feeling.
Happy National Hunting & Fishing Day.
Friday, September 23, 2005
Inspected

Thursday, September 22, 2005
Electrical Bonding...
I'm trying to line up the shotcrete for late next week. That'll give me time to finish the plumbing.
Monday, September 19, 2005
Installing Skimmer
Tonight I supported all the rebar chairs with flashing and added more blocks along the walls to support the rebar at the right distance. The chairs were starting to dig into the foam. I used the flashing on the house foam when this happened and it worked well.
I then started installing the skimmer. I began constructing the framework around the skimmer that will hold the concrete. I didn't have all the plumbing connections and didn't get to finish.

Sunday, September 18, 2005
Light Niches Installed

Busy day today. Only had time to install the light niches. Two 500W in the pool and a 250w in the spa.
Need that electrician, now!
Went through the pool equipment shipment. Realized that I have to modify the rebar around the drains. I also have to redo the plumbing for the safety drain in the spa (along the wall). I probably will have to throttle its intake to insure that I get suction on the floor...
Pool equipment ordered from www.definitivepools.com:
Component, Manufacturer, Part #, Qty
Filter, Hayward, C4025 425 sq.ft., 1
Pump, Hayward, SP2615X20 2 HP, 2
Main Drain ,Hayward, SP1051AV 2", 5
Cleaner Filter, Nature2, W28145, 1
Skimmer, Hayward, SP1082, 1
Cleaner, Nature2 Professional G, 1
Blower, Polaris QT 2 HP, 1
Spa Jet, Waterway, pulsating, 4
Spa Jet, Waterway, pinning, 3
Valve, Jandy, 3-way 2", 1
Valve, Jandy, 3-way 1.5", 2
Chlorinator, Hayward ,C1220 offline, 1
Light ,Aqualight, 773603 250W, 1
Gunite Fitting, Waterway, 2103700, 7
Jet Niche Adapter, Waterway, 255030, 7
Niche, Aqualight, 782433, 1
Light, Ameri-Quartz, 50ft. 500W, 2
Niche, Ameri-Quartz, 782105, 2
Spa Control Pak,?, 4-way, 1
Spa Electronic Pad, ?, 50ft., 1
Color Lens Pak, Aqualight, 78900100, 1
7 Eyeball returns were purchassed at another pool site.
1 Vacuum cleaner not purchased yet.
Saturday, September 17, 2005
Spa Complete

Didn't get started on the pool until about 3PM and finished by midnight. The spa rebar is complete. Things didn't go to well in here. The rebar mesh doesn't look that pretty, but will do...
Thursday, September 15, 2005
More Spa Rebar
Wednesday, September 14, 2005
Spa Rebar: Finally!
Tuesday, September 13, 2005
Extra Rebar
Monday, September 12, 2005
Bond Beam Complete
After a long hard day of coaching baseball, I finally got back into the pool and tied in the bond beam hooks and horizontal rebar. I first had to finish trimming the wall rebar. I used the sawsall first and realized that the bar was tougher than my blades. I then got out the handheld cut-off saw (grinder) and finished trimming. I wished that I could have done this at night - the spark show would have been great.
You can see from the picture that I am using large rebar for the bond beam. This is not necessary. I just had the #5 bar on-hand and figured it would not hurt to use stronger rebar!
I started insulating the spa and nearly finished it. I realized it was getting late - Mars was high in the September sky. I hit the sack at 1:50AM.
No, I haven't even inventoried the equipment shipment yet - it's still wrapped in plastic on the pallet!
Saturday, September 10, 2005
Details always slow youdown


I installed the step and middle seat rebar. These took about 3 hours longer than I thought they should have.
I've made the decision to trim the wall rebar to 2 inches above the bond beam. I'll use this rebar to tie into the deck slab that will surround the pool. Since darkness set in by the time I got around to trimming the wall rebar, I tried to use the 42-inch bolt cutters to snip it to the right height. I figured my neighbors might get upset if I took out the sawsall or cut-off saw. I added 3-foot of 1-inch pipe to the cutter handles to get more leverage. I was able to cut about 20 bars before my elbows felt like they were going to pop out - you have to see it to understand how big this set-up was...
Plan B for the evening was to cut and bend hooks for the bond beam. I cut 3-foot pieces and then bent each one into a 9-inch 90-degree "L". I'll tie these to the vertical wall rebar at the correct height for the bond beam rebar.
Friday, September 09, 2005
Make progress every day...
I also started placing the step rebar. This is a little more time consuming. I figure it's important to get the rebar close to the desired shape, but I am hoping that the shotcrete folks make it look nice.
The construction adhesive on the rebar/block combo is working great. The floor doesn't bounce around as much and the blocks are staying in place...
Thursday, September 08, 2005
Securing the floor...
I decided to shore up the floor rebar before I started spacing the rebar off the wall. As you walk across the floor rebar, the wall rebar jumps up and down and I didn't like that. I need that final bend to hit 3 inches from the top surface of the bond beam.
So, I did take Evan's suggestion and used a diamond blade on my tile saw to cut 2"x8"x16" blocks into nice uniform minibricks. I also finally accepted his other suggestion and adhered the bricks to the rebar with the strongest construction adhesive available. I only did this because I couldn't get to Lowes during the day to buy a coil of rebar tie wire , which I would have preferred to use to tie the bricks in place and I had the adhesive already.
I'm finding that my surplus of construction material from building the house is quickly getting used on this project. I'm now trying to figure out where to put the bathtub that I ordered for the house but could not use or send back! If I had not already dug the spa...
Wednesday, September 07, 2005
Pool Equipment Arrived
Typical shipping company: they alloted 8-11AM for delivery and said they would call 1 hour prior to alert me. They showed up at 7:55AM and I got the call at 8AM. I'm thankful that I was the 1st delivery on the truck, though. Now, I don't have to run back home from work...
Rebar: Walls

I finished tieing in the horizontal wall rebar tonight (picture taken the next AM).
My thumb is killing me...
Tuesday, September 06, 2005
Rebar: Floor
I finished laying in the lower layer of rebar in the morning. Two friends, Evan & Jim, stopped by to help finish laying the upper layer of floor rebar. I finished the corners later at night.
Monday, September 05, 2005
Insulation...

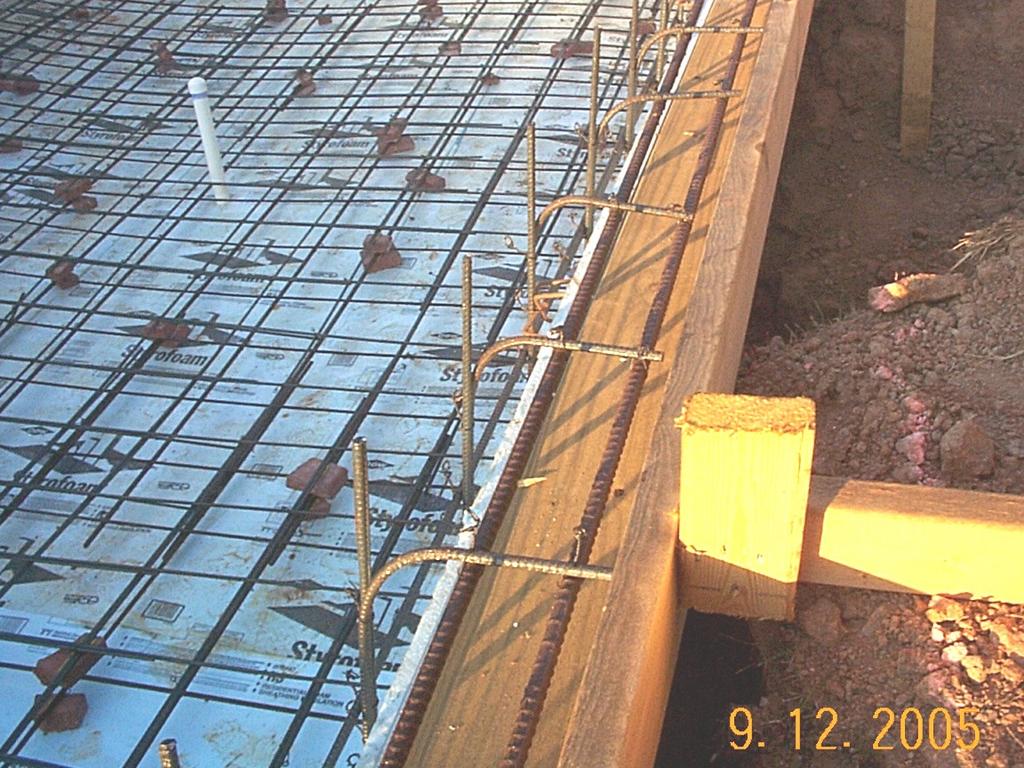
After all the walls were scraped vertical (well almost vertical - I left an outward slant?), I added high density foam insulation. I used 1 inch along the walls, 1.5 inches on the floor, and 2 inches in the spa. This will save me more than 40,000 BTU/hour (45, 000 BTU/hour without versus 5,000 BTU/hour with insulation). Insulating is a no-brainer. The pool will weigh no more than 3.5 psi and the foam can handle more than 25 psi! You should check out www.poolnut.com for more details.
This photo also shows a layer of rebar started on the floor. I decided to use two layers of rebar in the floor: one layer at 2 inches and the second at 4 inches. The concrete will be a minimum 6 inches thick. The two layers places steel at the critical tensioned areas in the slab. Because no one can convince me that either the top-side or the bottom-side of the slab is in tension more, I covered my bases with about $100 of extra rebar I had laying around from the construction of my house!
Saturday, September 03, 2005
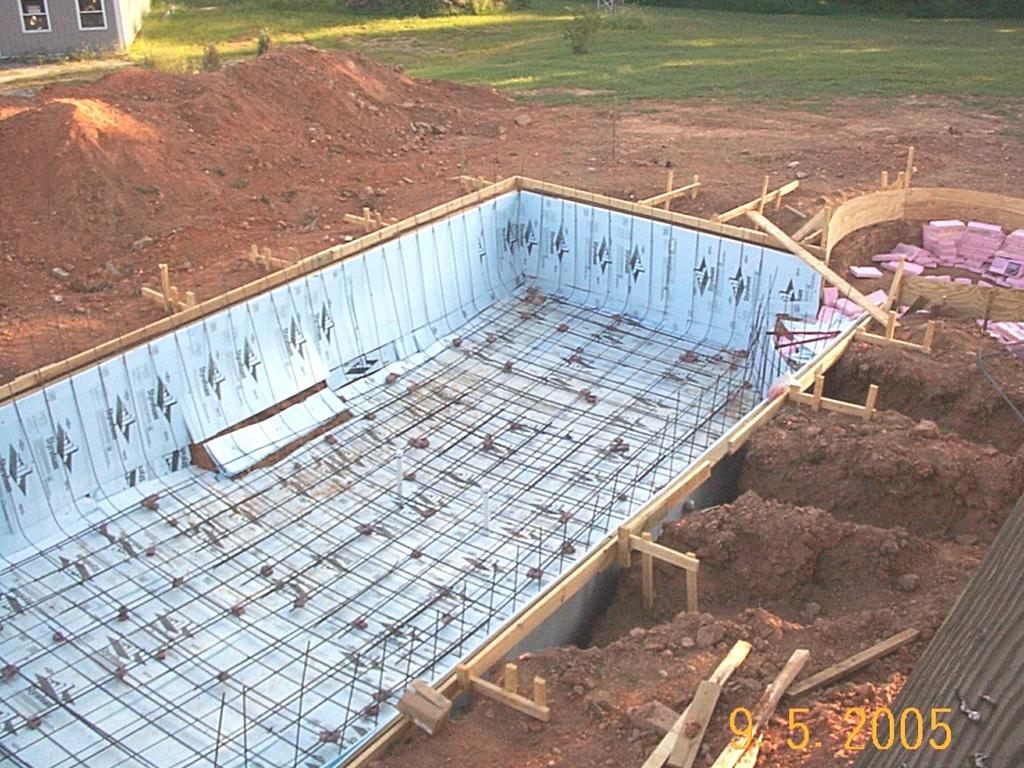
Forming the pool...

Once the dig was completed, the next step is forming the bond beam. The bond beam determines the shape of the pool and provides structural strength to the walls. These pictures show the bond beam forming, the end wall framing, and the spa forms.

The bond beam was formed because I decided that I did not want to hand dig the beam. So, I over dug the pool walls. I ended up having to hand dig the walls more uniform anyway. I don't know if I actually saved myself any effort. The ledge of the beam form will support insulation sheathing. I constructed the ledge from PT wood in case I can't remove it after the shotcrete goes in.
The end wall was framed because I had to dig a small ramp at that end to get down in (and out) of the hole with the backhoe. This is similar to forming pools in Florida - so I've read... Again, the frame will be covered with insulation sheating.
I dug the spa by hand. It came out slightly out of round. Having a house porch over look the pool requires that I do a better job at making it circular. Staking the forms first using a rope tied to a centered, plumbed stake helped.
After the forming went up, I added the drain lines. Both the spa and the pool will have dual drains for safety.
Ouch!


Fifteen minutes into the beautiful labor day weekend, I shot a nail down the length of my left thumb with the pneumatic nail gun while completing the forming. I wasn't about to wait in the hospital. So, I made sure I hadn't broke anything after I pulled the nail out, cleaned it up, bandaged it, and went back to work... Jennifer was so concerned that I wouldn't make any progress on the pool this weekend, that she encouraged me to get back on that horse and get to work!
The photo is two days later. The swelling was down quite a bit but not the pain!
Anybody want to read my palm?
-------------------------------------------------
Emailed comment I thought was funny...
Hey didn't you put a nail in your finger when you were working for me?
You would think twice in a lifetime for a smart guy is a little odd...
Dean Ott
Project Manager
-------------------------------------------------
Monday, August 22, 2005
The Hole.

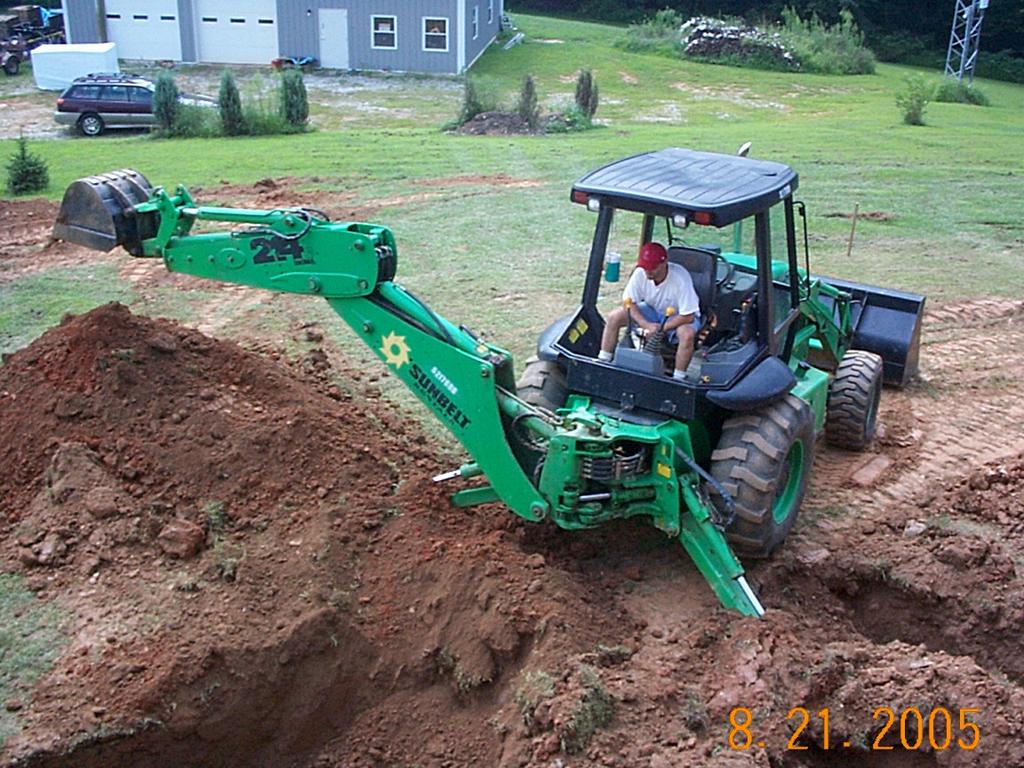
Digging was tough with the backhoe. I would use a front-end loader or bobcat if I were to do this again. The backhoe made it difficult to maintain a uniform base. It left a lot of loose soil in the bottom and I ended up driving down into the hole to compress it. The second time I did that I got stuck. It took me about 20 minutes, using the backhoe arm, to finally get out. I could have dug a ramp, but I was trying to avoid further digging - and darkness was setting in.
That's me in the hoe and a future DIY swimming pool owner, Evan, helping me determine correct depth...
The Digging Equipment Arrives!

The backhoe arrived, Saturday, from Sunbelt Rentals around 3PM. I was in the middle of a cook-out party and couldn't start the dig until the next morning. Before the dig, layout the pool with marking paint...
Friday, August 19, 2005
First supplies arrive: Rebar Delivery
Tuesday, August 09, 2005
In the beginning...
On July 28th, I applied for the building permit. I needed 4 copies of the drawing package. The package included a copy of the land plat, location of the boundary lines to the pool, location of the pool to the house, pool plan, and cross-sections of pool construction. All pool drawings were sketched by hand. Cost $275.
I also finished creating material take-off lists for plumbing, rebar, and pool equipment.
My pool equipment list, so far, looks like this:
Component Manufacturer Part # Qty
Filter Hayward C4025 425 sq.ft. 1
Pump Hayward SP2615X20 2 HP 2
Main Drain SP1051AV 2" 5
Returns eyeball 7
Skimmer Hayward SP1082 1
Cleaner Nature2 Professional G 1
Filter Nature2 W28145 1
Vacuum Hayward Navigator 905C 1
Blower Polaris QT 2 HP 1
Spa Jet Waterway pulsating 4
Spa Jet Waterway spinning 3
Valve ? 3-way 2" 2
Valve ? 3-way 1.5" 1
One pump is for the pool and the other is for the spa. The pool pump may be a bit oversized, but I plan on running the return through solar heaters... I still might downsize to a 1.5 HP pump, though.
I'm using #3 (3/8") rebar on a 12"x12" pattern. I'll need 240 20-ft pieces and 30 16-ft pieces.
For plumbing, I'll just buy boxes of fittings (2" and 1.5") and then return what I don't use. I've figured about 35 and 25 10-ft 2" and 1.5", respectively, sections of Sch. 40 PVC pipe.
Electrician is coming out tonight to bid the job.
Still need to locate shotcrete & plaster subs...